Storyboard : How to Add Border To UIView In Storyboard
This article discusses how to add border to UIView in storyboard.
Step 1: Create a UIView
Views are the basic building blocks of your app’s user interface. A view can be a simple as a label or text field, or as complex as a map or web view. In this article, we’ll focus on the simplest kind of view: a UIView.
A UIView is a rectangular area on the screen that can contain other views (such as labels, buttons, and image views). You can use storyboards to add a UIView to your app’s user interface. Here’s how:
1. Open your storyboard file and select the view controller where you want to add the UIView.
2. In the Object library (located in the bottom-right corner of the Interface Builder editor), search for “UIView” and drag a view into your view controller.
3. Resize and position the view so it’s how you want it to look in your app. For example, you might want to center the view in its container view.
4. To add content to your UIView, drag one or more views from the Object library into the UIView you just added. For example, you could add an image view and a label to display text beneath it.
Step 2: Add Border To UIView In Storyboard
In Step 2, you will learn how to add a border to your UIView in Storyboard. This is a quick and easy way to give your view a polished look.
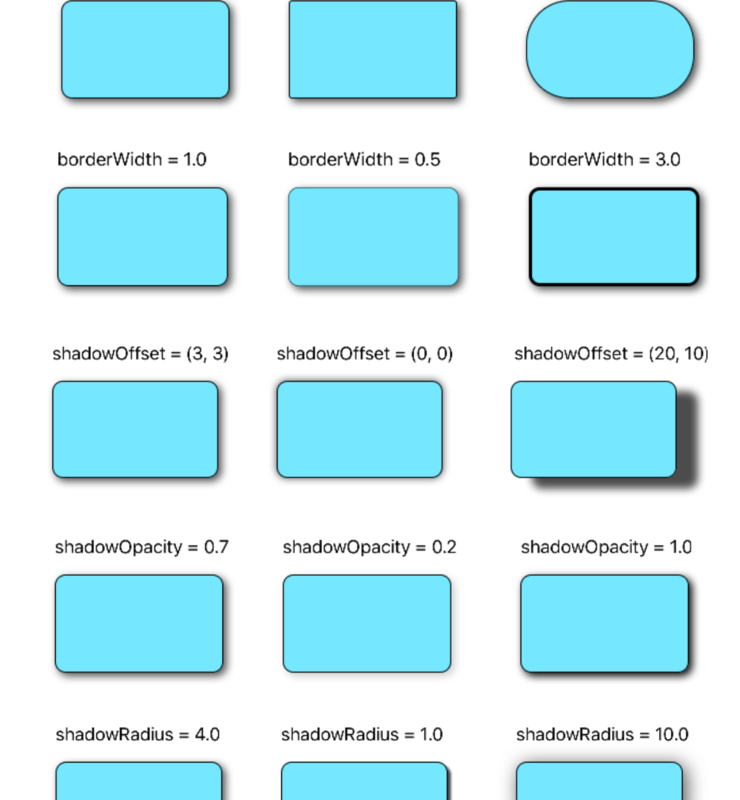
To add a border, first select your view in Storyboard. Then, in the Attributes Inspector, scroll down to the “Border” section. Here, you can specify the width, color, and corner radius of your border.
Once you have configured your border settings, simply click the “Add Border” button to add the border to your view. That’s all there is to it! Your view will now have a beautiful border that really makes it stand out.
Step 3: Add UIButton
Adding a UIButton to your UIView is a simple process that can be done entirely in Storyboard. To get started, open up your Storyboard file and select the UIView you want to add the button to. In the Attributes Inspector, find the section labeled “User Interaction Enabled” and check the box next to it. This will allow us to interact with our view through code.
Next, drag a UIButton from the Object Library onto your view. You can position and resize the button however you’d like. In the Attributes Inspector, find the section labeled “Title” and type in the text you want your button to display.
Now that our button is added and configured, we need to write some code to make it do something when tapped. Open up your ViewController.swift file and create an action for your button by Control-dragging from the UIButton in Storyboard to just below your viewDidLoad() method in your ViewController class. Give your new action a name (I like to use “buttonTapped:”) and make sure that it’s of type UIButton. Your action should now look like this:
@IBAction func buttonTapped(sender: UIButton) { }
Now we can add whatever code we want inside this action method! For our purposes, let’s just print out a message to the console so we know everything is working properly. Our final buttonTapped:
Step 4: Configure UIButton
Configuring a UIButton in Storyboard is easy. Simply select the button, and in the Attributes Inspector, change the Button Type to Custom. This will allow you to modify the button’s appearance to your liking.
Next, in the Size Inspector, change the width and height of the button to whatever size you want. I usually make them slightly larger than my UIViews so they’re easier to press.
Finally, in the Button section of the Attributes Inspector, you can modify the background color and title of your button. I like to keep my button titles short and sweet, so I usually just use “OK” or “Cancel.”
Conclusion
Adding a border to a UIView in Storyboard is easy and only requires a few steps. With the right settings, you can add a border to any view in your app with minimal effort. We hope this tutorial has helped you learn how to add borders to views in Storyboard. If you have any questions or comments, feel free to leave them below.